Mar 24, 2012

How to debug the ASP.Net MVC framework

http://weblogs.asp.net/gunnarpeipman/archive/2010/07/04/stepping-into-asp-net-mvc-source-code-with-visual-studio-debugger.aspx

Using Visual Studio symbols and source files makes debugging much easier. I am specially happy about ASP.NET MVC 2 source files because I develop on ASP.NET MVC 2 almost every day. You may also find other useful symbols and source files. In this posting I will show you how to get ASP.NET MVC source to your computer and how to use it.

1. Debug options

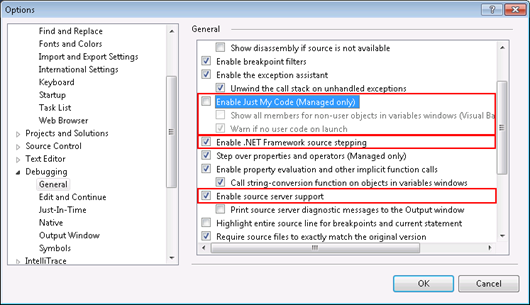
Open options dialog and make sure you have check boxes set as on following image in red boxes.

debugoptions

2. Download symbols and source

Now we have to allow downloading symbol files. By default the location of symbols is somewhere under application user data folder. I prefer some location on some drive root usually.

debugsymbols

NB! I chose “All modules, unless excluded” to get everything from symbol server. If you need only MVC symbols then choose “Only specified modules” and add System.Web.MVC there (you can also add other modules you need).

After clicking OK you see window like on following image. Make a cup of coffee and wait until symbols are downloaded. It takes a while.

downloadingpublicsymbols

3. Debugging

Open your ASP.NET MVC application, put breakpoint somewhere in code and run it. Wait until code execution hits the breakpoint.

aspnetmvcbreakpoint

When breakpoint is hit click Step-in and Step-over icons to go to some line where some method of ASP.NET MVC is called. On this method click Step-in.

4. Source code download

If ASP.NET MVC source is not there yet then you can see EULA windows like on the following image.

aspnetmvcsourceeula

If you don’t plan to do anything illegal then click Accept button. You may get some warnings about file downloads and UTF-8 encoding. Say Yes and when ASP.NET MVC source is downloaded you can see something like on the following image.

aspnetmvccontrollersource

Well, we are in View() method of controller class. Not bad at all! :)

More symbols

You can find more symbols and source files from Microsoft Reference Source Code Center. For .NET Framework you can find only symbols right now. Hopefully source is also coming soon.
Mar 4, 2012

Installing SQL Server Management Studio for Sql Server 2008 R2 Express

Step by Step Solution for Installing SSME
----------------------------------------------------------
0. If you are using Server 2008, Install Windows PowerShell using these instructions: http://www.tech-recipes.com/rx/2521/windows_server_2008_install_windows_powershell/. Otherwise download and install it from here: http://technet.microsoft.com/en-ca/scriptcenter/dd772288.aspx


1. Download and run the SSME installer from http://www.microsoft.com/downloads/details.aspx?familyid=08e52ac2-1d62-45f6-9a4a-4b76a8564a2b&displaylang=en


2. Click Installation on the left side of the the wizard.


3. Select "New SQL Server stand-alone installation or add features to an existing installation". Click OK.


4. On the Setup Support Files page, select Install.


5. On the Setup Support Rules page, click Next (the Windows Firewall warning is ok).


6. On the Installation Type page of the wizard, select "Perform a new installation of SQL Server 2008", then click Next. (I realize that this is counter-intuitive, but if you select "Add features to an existing instance of SQL Server 2008", you will be met with a greyed out pre-selected option to install the SQL Client Connectivity SDK, and you will not even see an option to install "Management Tools - Basic".) You will see that SQLEXPRESS is recognized as an installed instance.


7. The Product Key screen is all greyed out with the "Specify a free edition" selected. Click Next.


8. Agree to the License Terms as usual. Click Next.


9. On the Feature Selection page, you will FINALLY have a blank checkbox next to "Management Tools - Basic". Put a check in that box. SQL Client Connectivity SDK is selected and greyed out by default; so is the install location. Click Next.


10. Click Next on the Disk Space Requirements screen.


11. Check both boxes to send error info to Microsoft if you wish. I usually do so that they can make the product better. :-) Click Next.


12. Click Next on Installation Rules page if your system passed.


13. Click Install on the Ready to Install page.


14. Hopefully you will see a "Management Tools - Basic Success" message on the Installation Progress page of the wizard. Click Next.


15. You should see a "Your SQL Server 2008 installation completed successfully" message on the Complete page. Click Close.